

This is how to turn your old, crummy Windows 11 setup into an old, not crummy Windows XP setup, without downgradin'!
Previously, I talked on a whole lotta places about what I did to my poor, poor Windows 11 PC. Due to a whole lotta people wantin' me to, I decided made a page tellin' you how any slightly crazy human can make his/her Windows 11 PC look like XP. This guide has pictures, so hopefully it should make more sense.
It's also sometimes updated to make sure it still works. The latest make-sure-stuff-still-works kinda update was on March 8th of 2026. I use this guide for my own PCs, so if there's a crazy Windows 11 update that messes everything up, hopefully I'll notice. Then again, I'm stupid.
By the way, there's a lotta stuff here that can mess up your PC, so make sure that:
1. You trust me.
2. You trust yourself.
3. You trust Vindosecspi, the destroyer of... Somethin'. (idk)
Note that, unlike the power of love, you may need a credit card to ride in this train. (Please keep readin'. There are ways to circumvent this monetary crisis.)
If you have any trouble understandin' what I'm saying, tell me about it!
Well uhh, there's not much else to say before I subject you to this.
So, here we go.
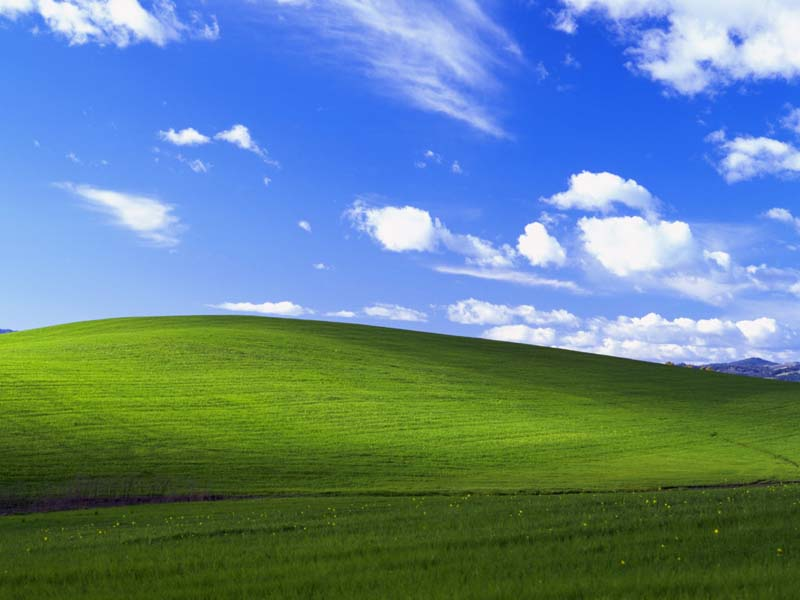
 1. The Desktop Background. (ignorance is bliss)
There's many pictures of Bliss online, but you want the authentic background, don'tcha?
I assume that you -- bein' someone who wants to make their PC as accurate to XP as possible, -- wants the original image bundled with XP. I say this because I'm mad at certain people. >:(
So, here's a link to Bliss.bmp.
Be sure to set the scalin' for the desktop to stretch.
 2. The taskbar. (yeah!! woo!)
The new Windows 11 taskbar sux.
But XP's doesn't, so dremin made Retrobar, here's the link to that.
Before you run it, go into the Windows 11 settings (not Retrobar's) and make sure that Automatically hide the taskbar is on.
This seems to make Retrobar more reliable. Atleast, that's what I've read. I spell "at least" like 'atleast' because it feels cooler. >:(
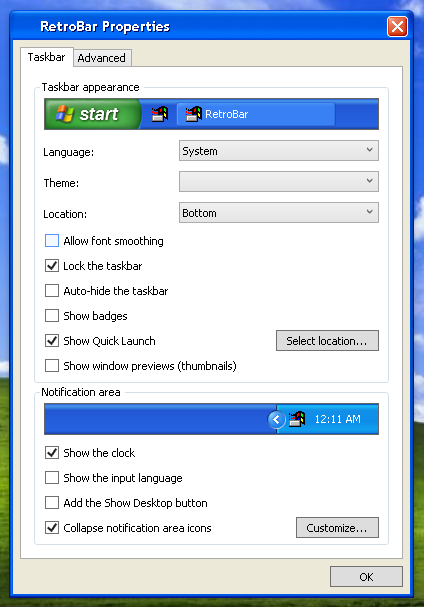
After that, run Retrobar, right-click the taskbar, and go into its properties; there, you can change the settings to your likin'.
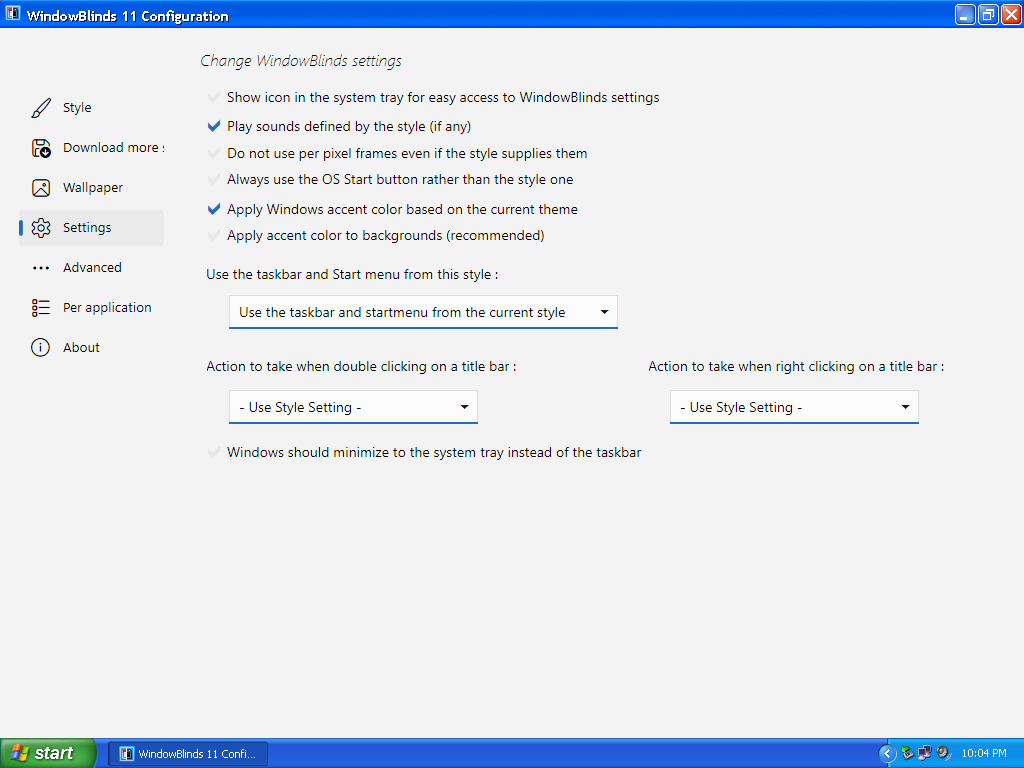
If you wanna have the default settings, configure the taskbar properties to look like the picture to the right. Also, make sure the Show Exit option in right-click menu and Use software rendering checkboxes in the Advanced tab are unchecked.
If Retrobar doesn't start on log-on, then you'll have to make it do that yourself. Make a shortcut of Retrobar and put it in your startup folder. To get to said startup folder, go to the Run prompt, and type in shell:startup.
And that should be all for the ta-
Oh, hold it, heel, stop, cease, halt, freeze, desist, and all that stuff.
Retrobar got a new update after most of this step was typed out.
That allows NetAnimate to do its thing. What's NetAnimate? It's a surprise tool that will help us later.
Also, one other thing, make sure to LOCK THE TASKBAR!
LOCK THE TASKBAR!
 3. Icons. Darn it.
What's a desktop without icons? Here's a link to the Windows XP shell32.dll so you can have all the icons you need!
Also, don't replace 11's shell32.dll with XP's. Instead, just change the icons by hand. It's easy-to-find knowledge about how to do that, you don't need me to tell you. By the way, while you shouldn't replace shell32.dll with shell32XP.dll, you could put shell32XP.dll in System32 for ease of use; just make sure its filename is shell32XP.dll.
You may say, "Oh, what about IconPackager?"
Well, I tried it, but it didn't work well for me. It seemed to mess up quite a lotta stuff, so I'd not use it.
You should make the desktop icons small, like XP's. To do that, right-click the desktop, hover over View, then press Small icons.
Also, you can't use the regular way of puttin' the My Documents and My Network Places on the desktop since the My Documents one doesn't say My Documents; it just has your name on it, and My Network Places just says Network, and you can't rename either of them.
So instead, you'd have to use shortcuts named My Documents and My Network Places that redirect to your documents and your network folder. Now, because it ain't as easy as just makin' a shortcut to an executable, I've made the shortcuts for you, all you gotta do is put them on the desktop. Here's the My Documents shortcut, and here's the My Network Places one. For some strange reason or another, certain browsers may download these as a .DOWNLOAD file. All you gotta do if so is rename the files to .LNK files, yes, not .INK files. I had wondered for a while why my download link wasn't even downloadin'. Really, there's barely an indication that it spells out .LNK. Try it! Open the shortcuts' properties window! It just looks like a supposed ".Ink" file!
The problem is that all shortcuts on Windows 11 have a little annoyin' Windows 11 arrow in the corner of the icon, so I'll tell you how to get rid of that in the next step.
Here's the XP shortcut icon, so once you remove the 11 shortcut arrow in the next step, you can put the arrows on all of your other shortcuts with GIMP, or somethin'. Have lots of fun with that one.
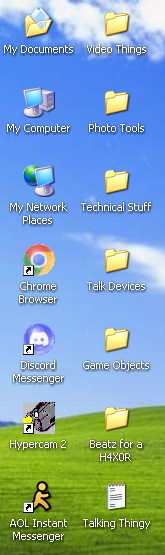
Now, -- from what I've seen -- the default configuration of icons seems to be like this: My Documents at the top left, followed by My Computer right below it, My Network Places, and finally Internet Explorer followin' suit in that order. The Recycle Bin's location is at the very bottom right. *spits sunflower seed* Usually.
Now, I don't use Internet Explorer, so I skinned Pale Moon to look like my version of what would be a 2001-2007 Google Chrome, which I very originally called Chrome Browser. Here's the icon to that.
Usually another icon you'll find below Internet Explorer is MSN Messenger, but since there's very few people who still use MSN, I got Discord Messenger, so, as with Pale Moon, I made a new icon for it. Here's that one, too. (btw, Pale Moon and Discord Messenger both have neat icons, but I like MINE more!)
Also, you can see AIM in the image I show. Like MSN, It works, too.
With all these icons on the desktop, you might ask, "What about the label fonts for those icons? They are all Windows 11-ey!"
And that question brings with it the next things we'll have to do.
 4. The Point Of No Return (a.k.a. The Icon Labels. (And, by extension, the fonts, along with a few other changes.))
This is the part where most people stop. Usually they get the taskbar, the icons, the background, and the start menu.
However, we aren't most people.
We want it to be as accurate to XP as possible, right?
RIGHT?
Cue Winaero Tweaker.
Now, Winaero Tweaker can really mess your PC up if you don't know what you're doin', so try not to make any PC-destroyin' adjustments.
When you first install Winaero Tweaker, you'll might get a few pop-ups sayin' that it's malware, but I haven't had any problems since I've installed it (and most people agree it's safe, too), so don't worry. (Trust me, I'm a totally respectable man. C'mon, please?)
So the first thing you wanna do when you go into Winaero Tweaker is disable Copilot. There's a big reason why; I just don't like it.
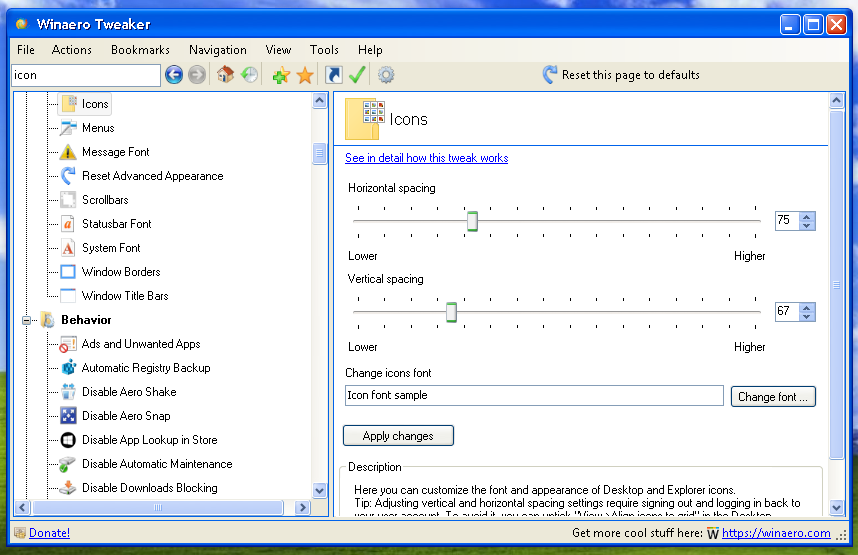
Next, go to Advanced Appearance Settings and select Icons, then change the icon font to Tahoma and make the size of the font 8.
You can kill, like, 139 birds with one stone in Winaero Tweaker, though.
If you wanna make it even more accurate, go to Advanced Appearance Settings and select Message Font, then set the font to Tahoma. When I did this, I set my font size to 9, since for some reason my computer downscaled the message fonts by 1. Yours might not, but I'm not gonna check to see if that's normal since I'm too lazy; just eyeball it.
Now the next setting is the Menus one. This setting works normally for me.
You should set size 8 Tahoma for the Statusbar Font setting as well.
Now, for Window Title Bars, you'll have to set it to Trebuchet MS, make it Bold, and set the size to 10.
Finally, set the System Font to Tahoma. (There's no option for size on the system font, and please note that a lot, if not most, programs don't support these system changes, so don't get upset when you open a window and it isn't the size 8 Tahoma you wanted; it's just not supported for that program.)
If you want even more XP-ism, go to the regular old Appearance tab and select Startup Sound.
Almost forgot, you can remove the shortcut arrow icon by goin' to the Shortcuts tab, clickin' Shortcut Arrow, and pressin' No arrow. (The reason you should press that instead of the classic arrow option is because in order to have the correct labels for all the icons on the desktop, you have to use shortcuts for the My Documents icon and the My Network Places icon, like I explained before.)
This last step is only for people who look into the real tiny details. Go to Advanced Appearance Settings (Deja vu!), click on Icons, make sure the horizontal spacin' is 75, and set the vertical spacin' to 67. (I'm not entirely sure of those numbers because Retrobar groups certain spacin's of desktop icons. Maybe Retrobar will get a new update that fixes that, but for now you'll have to settle the closest-to-correct icon spacin' of the icons.) (SPAAAAAACE!)
Restart your PC and look at the new old fonts! (If things didn't go so hot, Winaero Tweaker comes with things to help revert the changes.)
You might notice that, even though you changed all that, the fonts dont look pixel-ey like you know Windows XP's fonts do.
Truth is, XP's fonts can look like that, but most people don't enable it, so I'll show you how to turn off font smoothin'. (And, while we're at it, a couple other things.)
Go to the Windows 11 Settings (not Winaero's) and go to Accessibility and select Visual Effects.
There, turn off Transparency Effects.
You don't actually have to do this to turn off font smoothin', I just wanted to take a shortcut so we didn't have to do that later.
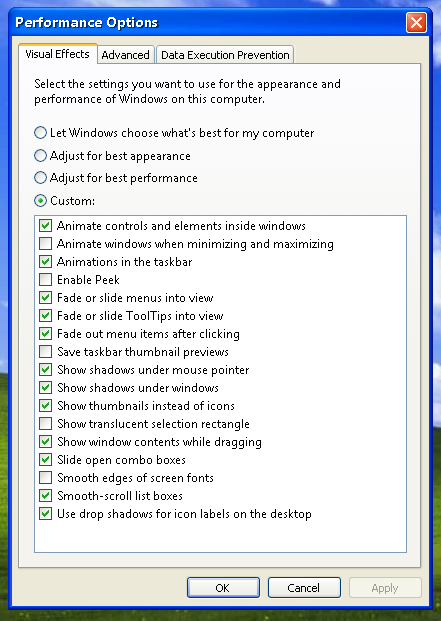
Now, to actually turn off font smoothin', search in the search bar for the word performance and click on Adjust the performance and appearance of Windows and turn it off in the window that pops up. But there's also more settings here we can configure to make it feel more like XP. (It should be noted, once you turn off font smoothin' it doesn't just turn it off for the desktop. You live with the infinite pixellation for all of your life.)
Follow the picture's checkmarks. (Really, XP also has minimizin' and maximizin' animations, but they look nothin' like the ones in 11.)
Now take a look at your desktop!
Yabba dabba doo!
Just like XP!
But there's more, unfortunately.
 5. Press Start!
The Start Menu is essential to anyone who wants to get goin' on it.
The closest you can get to that sweet XP style is Open-Shell.
Unrelated, but it's 6 AM; I'm tired, but, of couuurse, you need to know how to do the thing, right? RIGHT?
Before you install Open-Shell, right-click on the desktop, click on Personalize, go to Taskbar, then go to Taskbar behaviors, and set Taskbar alignment to Left.
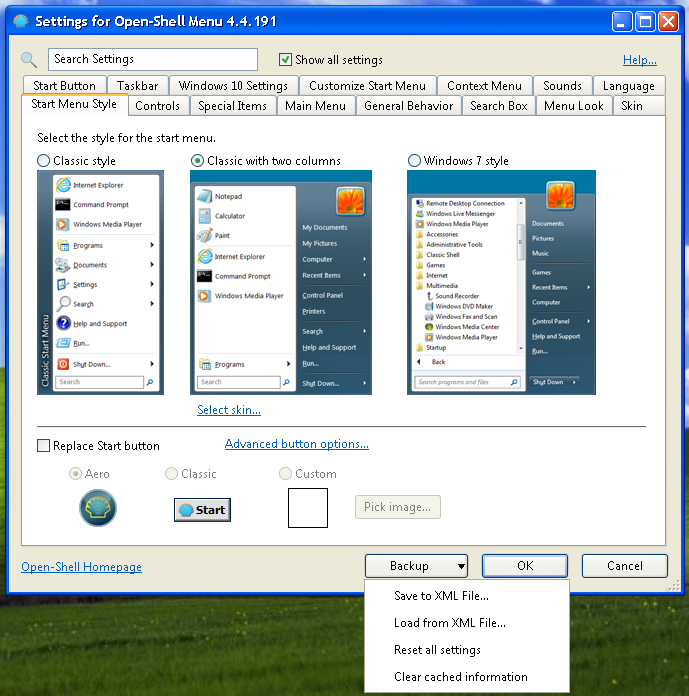
Once you start installin' Open-Shell, you can install the features you want. (Make sure to install the menu, though.)
Once you install Open-Shell, go to the directory C:\Program Files\Open-Shell\Skins and throw this bad boy in there. It seems to put a bad taste in Malwarebytes Browser Guard's mouth. This file can't be malicious, though, since it's a skin. I think. (I ran it through Virustotal and it came out clean, but I suppose since it only runs on one application, Virustotal wouldn't have much of an idea as to it's intentions.)
Next, find the Open-Shell Menu Settings, click the Backup button, select Load from XML file, and then select this file.
Also, it might not work, thanks to new Windows updates. Like, when you press the Load from XML file thingy, it might just... Not open the explorer. There is a solution others have valiantly found, even if a little rinky-dinky. First, right-click the .XML file in your downloads folder, then press Copy as path. Now then, press the Load from XML file button again, and immediately after press the Windows key. This will open up the explorer for some reason, but you can't navigate thru any of the folders; so paste what you copied into the File name field, then press Open. This should work, but maybe in the next Windows update, it'll do somethin' even weirder.
Now, you'll find that the icons might not be sorted how you like them; that's because it's sorted how whoever made that skin liked them. (I'm not sure who made the skin.) You can't change the right column's icon places in the menu as easily because the icons will be missaligned, you'd have set each icon again, with each change.
Also, the name and icon is stuck as Administrator in the top bar of the Start Menu; that's because that's just how the skin's built. :(
Also, the lower rows on the second column's icon labels are bold when they shouldn't be, the Log Off icon label's black if you have WindowBlinds on for some reason, the Turn Off Computer label's smooth, and the spacin' for the 6 recent programs is slightly off. Yet, somehow, no one's come up with a better skin..
If the Start Menu isn't as described and buggin' out, then you'll just have to reset the skin, and use the standard XP skin on Open-Shell. It's a lot more stable, but less accurate. Boooooooooooooooooooooooooooooooooring!
 6. WindowBlinded By Riches.
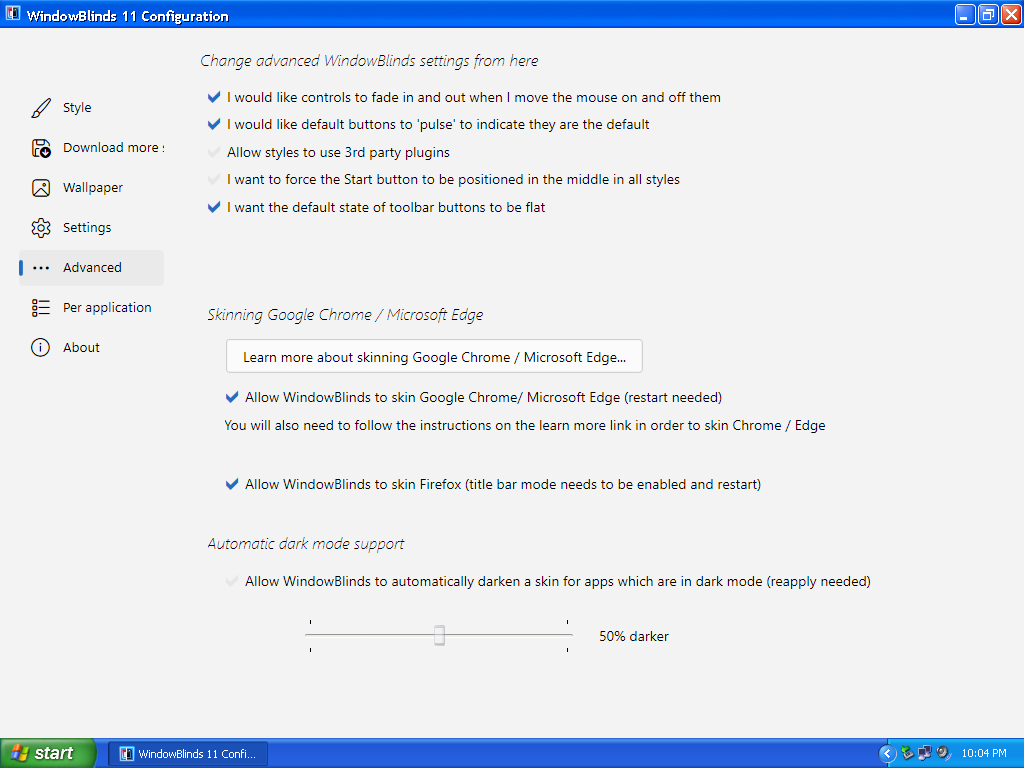
Get your mom's credit card; we are in trouble.
You want the classic Luna XP window borders, right? You want the classic funny XP sounds, right?
There's ways of doin' just that, but none of them have less than 5 antiviruses goin' off in VirusTotal.
That's why Stardock (yes, that Stardock) made Windowblinds so everyone could have different themes for Windows.
Now, that's good and all, but there's a small problem with all that stuff. Multiple actually.
1. You might have to redo some of the stuff from step 4 of this guide once you apply the style.
2. It doesn't change the sounds.
3. Most important of all, it's 30 bucks!
I'm very much overreactin' about the severity of this.
Well, install WindowBlinds real fast, and I'll tell you what to do from there.
You have to enter your email to start the free trial. Still, no credit info needed.
Oh, yeah, there's a free trial. If you like it enough, you can buy the key to activate it forever for 30 bucks. I'm sure there's alternatives, but they're too sketchy for me.
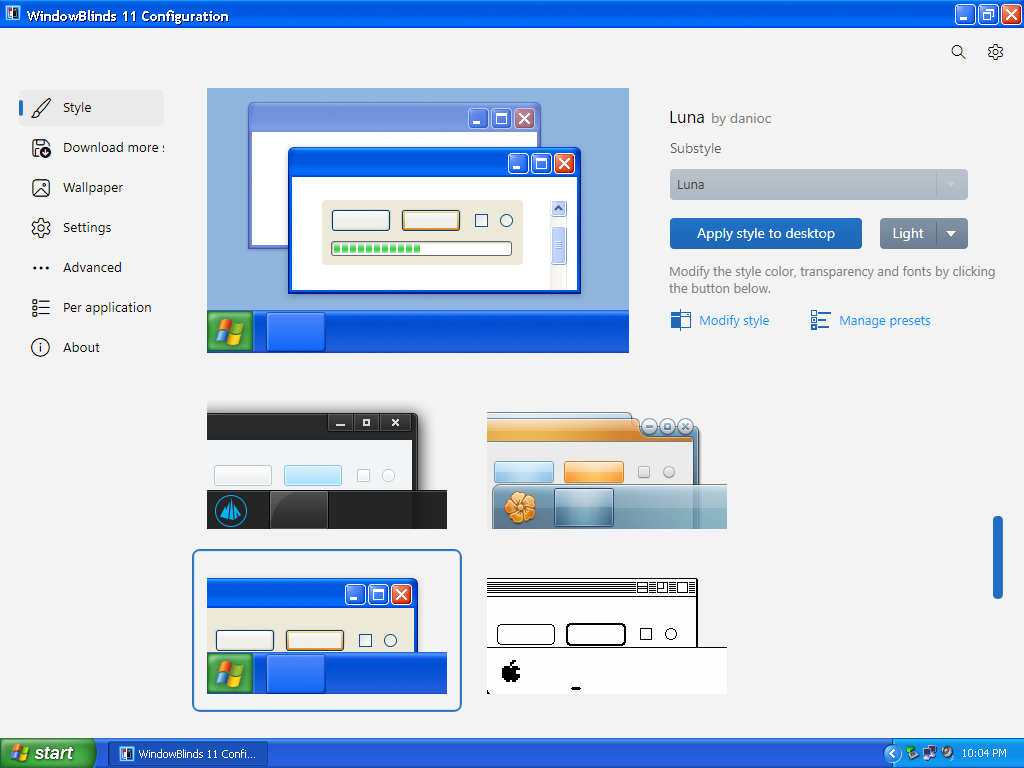
Once you get to the main menu, all you gotta do is select the Luna theme.
Just kiddin, as with anyone who takes a likin' to the past, you gotta put in some effort to get there.
Set the settings to the set of settings I set. (You can tell what they are by the pictures, knucklehead.)
Please notice you might have to repeat the font parts of step 4 of this page; this is because Windowblinds wasn't made with foresight. Why didn't I tell you to apply the font settings after I told you about Windowblinds? This page wasn't made with foresight, either.
You'll want to set the system color to Blue, because it might have been changed, too.
One thing to note, you better not use Windowblinds 11 on Windows 10. The likelihood of the destruction of your OS increases exponentially. (It makes sense, this page is for Windows 11, not 10, dummies.)
...
Alright pal, we got the windows all xp-ey, now how about those sounds?
Stardock's got an answer to that, too, and as you might guess, it pays a price.
Everyone applaud for SoundPackager.

It carries the burden of a lesser $5. Still, you can get a free trial.
SoundPackager is pretty similar to WindowBlinds in installation, so I won't go over that. (And also because it's too much work.)
Once you get it installed, though, you'll wanna activate Enhanced Sound in the SoundPackager settings.
Next, you might feel tempted to select the Windows XP one already at your disposal, and you can if you want, but I made my own, which I think is COOLER.
So, yeah, here's that.
Once you download that, just right click it and press Install Stardock SoundPackager Sound pack, then that should make it available as a sound pack in SoundPackager.
If you find the visuals of Windowblinds' Luna theme to be inaccurate, you can get this theme. It comes with other XP themes than just Luna, too! The only problem is that it can be slightly buggy for a small group, not me though. Should you use that theme, you might also want to check off Do not apply any style system wide fonts in the theme's font settings, and even so, step 4 of this page might have to be repeated once again.
Also, you need to blacklist Roblox from WindowBlinds if you wanna play it. Shame.
 7. "Yikes!" The Taskbar Tray Icons.
I'm from Indiana, so I'd know about it, but I hope you're ready for some Indiana Jonesin'.
You'll notice that to the far right of the taskbar next to the clock, there's loomin' icons in a tray that can be hidden or shown. This was the bane of my existence to change to the classic counterparts.
Sounds easy to change, right? You just, like, select the icons, and, like... Change them?
Well, there's some bad complications.
There must be about a million single ways to go down. ('Cause I'm a lonely stranger in this time bomb town.)
What I mean is, you can't really change them. You can get rid of them, and you can make them appear (in two ways, I'll explain that), but you can't change what they display.
So, our mission is this: Replace the 3 icons that are usually displayed by the system, along with the eject icon, with their XP counterparts. (The battery icon, network icon, volume icon, and the optional eject icon.)
Now, in order to make sense out of this thing on your part, get this: most icons on Windows 11 are stored in .DLL files and .MUN files, so if you wanna change an icon, you'll need to change one of those files.
These files usually contain more than icons, though. You'll see a picture that accurately describes my idea of this system. They have other content along with it too, so you'll need to get a file that is exactly the same as the original one with the exception of havin' different icons in it.
And then, you'll have to get permission from the mysterious Administrator and the annoyin' TrustedInstaller to rename the original file since it's in a system folder. (The reason you have to rename it is because it's still bein' used by Windows, and deletin' it on the spot... Messes up things I guess? And renamin' it doesn't?)
Then take your other file (the one with the icons you want in it) and put it in that folder.
Restart Windows and then go back in and delete the file with the icons you don't want in it if you wanna be neat: You have changed the icons. Hip hip hurray.
With that in order, let's start with the hard stuff.
Now, the battery icon really did feel like battery when I had to make the .MUN file for it, but nonetheless it was made, and here it is, batmeter.dll.mun.zip. (I had to put it in a .ZIP file to send it; otherwise, not only would Chrome think it's evil, Malwarebytes Browser Guard would think it's equivalent to the MEMZ trojan; you should be competent enough to know how to extract files from a .ZIP file by now.)
You won't get by without SndVolSSO.dll.mun.zip or stobject.dll.mun.zip either. Also, Chrome may still block the downloads, but the only reason it tries is because it's pretty unusual for people to be doin' this kinda thing.
So, since the files we are tryin' to replace are in a system folder, we gotta get permission to do the Indiana Jones stuff.
Now, I'm gonna give you step-by-step instructions with pictures of what this process looks like, so you'll understand what to do a bit easier.
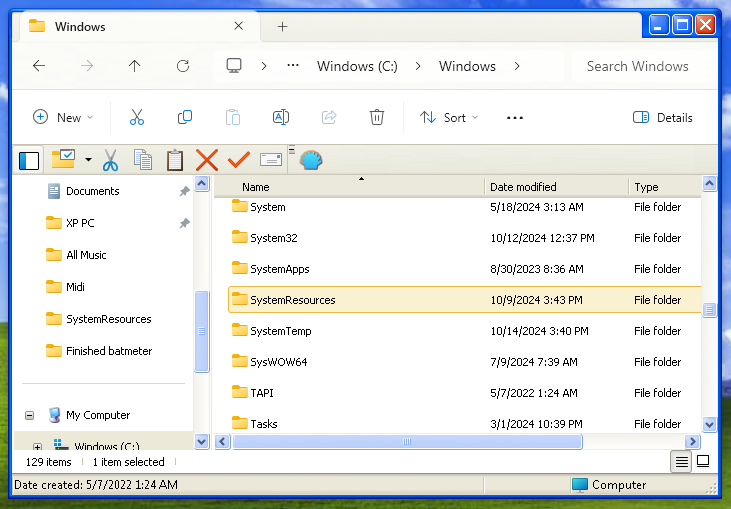
1. Go to C:\Windows and select the SystemResources folder, but don't go into it.
2. Right-click the folder and select Properties, then select the Security tab.
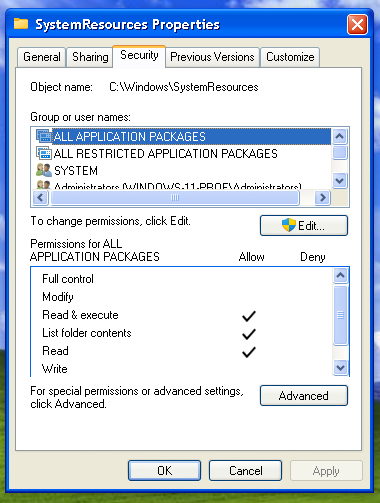
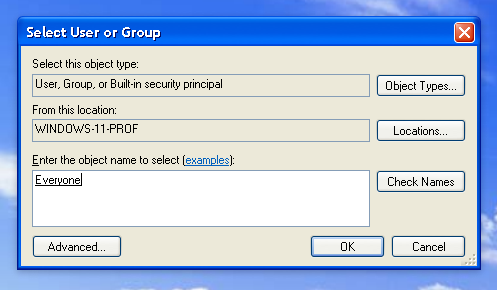
3. Click Advanced and click Change, then enter in "Everyone" and then click Check Names.
4. Click OK until you reach the Security tab again, then click Edit.
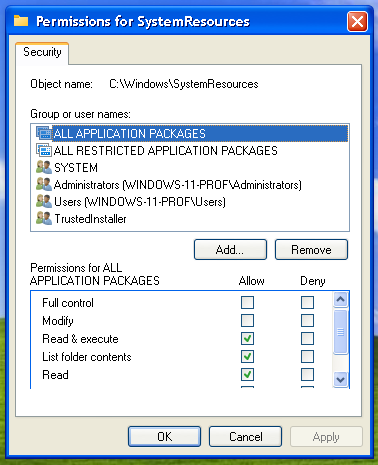
5. Select Administrators and check Full Control, then click OK.
You might need click some buttons on a few -- just a few, totally, -- prompts that may or may not pop up. Continue all the way, pal!
This is startin' to get REALLY frustratin', isn't it?
6. Click Advanced and click Change, then enter in "NT Service\TrustedInstaller" and then click Check Names. (No more collective ownership, it's post-1989!)

7. Click OK until all the Properties windows are closed, and just the Explorer remains.
A little complicated, but at least your computer didn't explode.
Well, you got the permissions, so now you gotta rename the 3 original files to somethin' that the system can't tell was the same file it was usin', like, "batmeter.dll1.mun" for the battery icon.
The files to rename, as you might have guessed, are batmeter.dll.mun, SndVOLSSO.dll.mun, and stobject.dll.mun.
When you try to rename them, you'll get a little UAC pop-up, proceed with the mission.
Alright, assumin' you did all that, now all you gotta do is drop the 3 modified Windows XP .MUN files that you downloaded in the same folder SystemResources, restart your computer, and maybe delete the original Windows 11 .MUN files if you are a neat freak like me. Actually, that might be a bad idea. It's your choice on that one.
Unfortunately, every time you install a big update or run the System File Checker, it'll find that the new files are "corrupt" and "fix" them. You should try to avoid usin' the System File Checker as much as you can, so you don't have to keep repeatin' this step.
Yayayay, old icons, hopefully.
BUT WAIT, THERE'S MORE!
The network icon might not be visible, and even if so, it doesn't flicker like XP's does!
Remember NetAnimate?
In Retrobar, not only can you collapse the tray and thus hide certain icons, you can banish ANY icon to the collapsed part of the tray, and even remove icons altogether.
Just right-click the tray and select Customize Notifications...
Then, you can select the behavior of the icons.
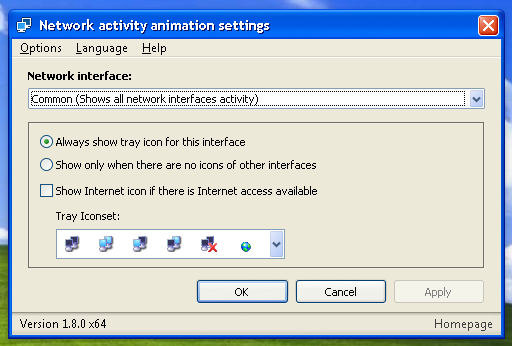
Cue NetAnimate.
Don't worry about half of the website bein' in Russian and download that thingaroosky.
Select the XP icons once you install it, and you can figure out the rest of the program yourself. >:)
Okay, fine, I'll give you some direction; make it look that picture.
And make the tray icon visible all the time with the Retrobar settings.
You can also sort the order of the icons that appear in the tray by disablin' and enablin' them usin' Retrobar. (Somewhat, that is; you have to disable them all and enable them with the one you want left-most first, and work your way to the right. You will have to do this every time you reboot if you want to keep it like that, though.
So, uh, yeah, it was complicated for some, but hey, cool icons! B)
 8. Other stuff you could do!
Heaven is one step away.
So, let me list off some minor things you might wanna do along with all this.
Your cursor is a pretty important thing to change, so go to the Windows 11 settings for the last time, search for themes, click on Themes and related settings, select Mouse cursor, and make the scheme (None).
I suppose you could also download this bundle of XP stuff I compiled.
And... Uhh... Hey, wait a minute!
There's nothin' left! I think that means we're done!
9. Success.Congrats. For the low, low price of $35, a day's work, and psychiatric care, you're livin' in the past like me.
Your desktop should look a little somethin' like this.

Now, you can sit back, rest easy, and bask in the glory of retro-ality. Whatever that means at this point.
Things I should probably mention:
1. After 8 months of work startin' in March of 2024, this page was finally ready to release on November 12th, at 10:04 PM. This date is cool enough for me to mention!
2. I have no idea how to use (this) and -- this -- properly!
3. Thanks to jtd who gave some advice on sendin' files of settings, and to my friend Vasily for proofreadin' this to make sure it's intelligible.
4. And big thanks to MYSELF for makin' this and testin' it all the time to make sure it works in the first place! >:(
5. If you first came to this website via this page, go to the index, sign my guestbook, and tell me what'cha think of this page!
6. I'm a complete idiot.